
Microsoft’s Excel can do interesting and useful tasks not standard to the Excel toolkit. We will do this by showing you how to use an accessible programming language called Visual Basic for Applications(VBA). VBA is simply Visual Basic, which is already built into many Microsoft Office programs, such as Word, PowerPoint, Access, and Excel.
This section is not meant for professional, full-time programmers or computer science majors. While these audiences will find many useful examples and material in this section, this section is not intended to be rigorous enough to provide the level of theoretical insight they require for accreditation in their endeavors. What this section does aim to do is to allow people either forced, or just inclined, to deal with Microsoft Excel at the VBA level, and to provide them with near-term ability and knowledge to quickly become productive in the production of Excel VBA applications.
What we intend to do here here to demonstrate how we can use Excel and VBA make the tasks that use Excel in the mobile television industry can be done more quickly, efficiently, and with increased accuracy.
There are two ways to use VBA in Excel. One way to get started is simply to place controls onto a spreadsheet. This method requires only the writing of the code that is to be executed when the control is clicked on or in response to some other event.
The other way is to set up a project with modules in addition to writing code. We have organized the code examples in this section into six modules that use this project approach. A description of the project method follows.
Many of the examples in this section are geared toward people dealing with systems integration projects, or pre-production planning, but they can be used for many applications. Many have pointed out that life itself is a project , and thus, many of the examples demonstrated here can be applied toward requirements you face in your life.
The examples in this section are broken up into a project with six modules and a section covering sound and video:
The first section of the section will cover basic information required to write, modify, and debug VBA code. You will quickly learn how to get around the VBA project environment, how to start writing simple programs by recording macros, and how to create command buttons. From there, you will learn how to create VBA software structures and how to use VBA to manipulate Microsoft Excel worksheets. Finally, you will learn how to troubleshoot problems with VBA code.
After this initial VBA introduction section we will move into the various examples mentioned above in the order listed. We will show you how to automatically generate worksheets, how to hide and unhide worksheets, and how to generate and manipulate toolbars to create easy-to-use shortcuts to programs you create.
Next we will show you how to make Excel act as a drawing program to create simple objects and lines. We will then show you how to make Excel create complex lines, blocks, and other objects.
In the next section we will demonstrate how VBA can be used to calculate finances, totally outside of the formulas that can be built into cells.
The remainder of this section will show how to use Excel to plan, design, and implement various aspects of a program. But, first, we need to introduce how we get Excel to automate many tasks. We will even show you how Excel can mimic many of the 2D features of mechanical drawing software.
Additional Resources
Now let’s get back to the actual implementation of code. Visual Basic for Applications (VBA) is built into most Microsoft Office applications. It is considered event-driven software because events drive the operation of the software. The VBA code provided is a collection of functions or macros that react to user input and data it encounters, usually the result of the contents of cells in worksheets. This software does not rely on formulas loaded into cells; it is all executed from VBA functions (macros).
Below are samples of formulas loaded directly into cells
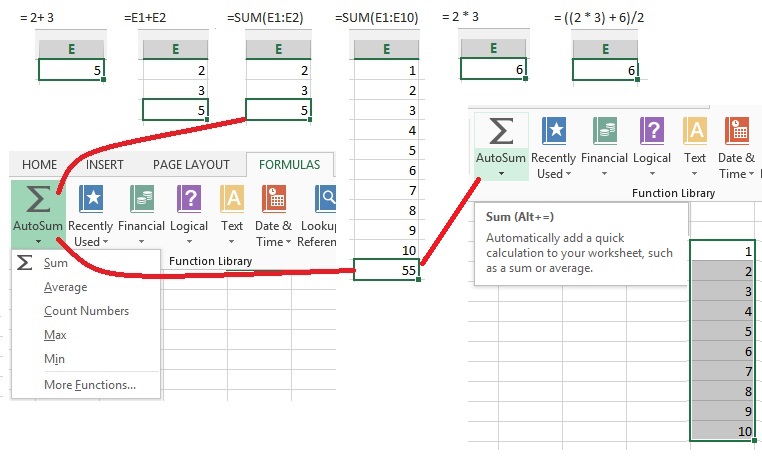
Here you can see how simple formulas can be loaded into a cell.
Starting from the left you can simply add two numbers
Next you can see how values can be changed in a couple of cells and it affect the value of a third cell
The same thing can be done by using the SUM() arguement
Either with a couple cells or with many
Many arguements can be called with a simple selection from a menu as with the SUM() arguement shown above
Simply highlight the cells in a column and then select SUM() from the formula menu
More complex formulas can also be constructed as shown in the upper right
Below is another example of selectable built-in arguements

Below yet another example of selectable built-in arguements
Below examples of many of the built-in functions
As you can see there are many built-in functions in Excel. A couple problems is that if you don't protect a cell with a formula in it, that cell can easily be over written. Also there is just so much more you can do using VBA
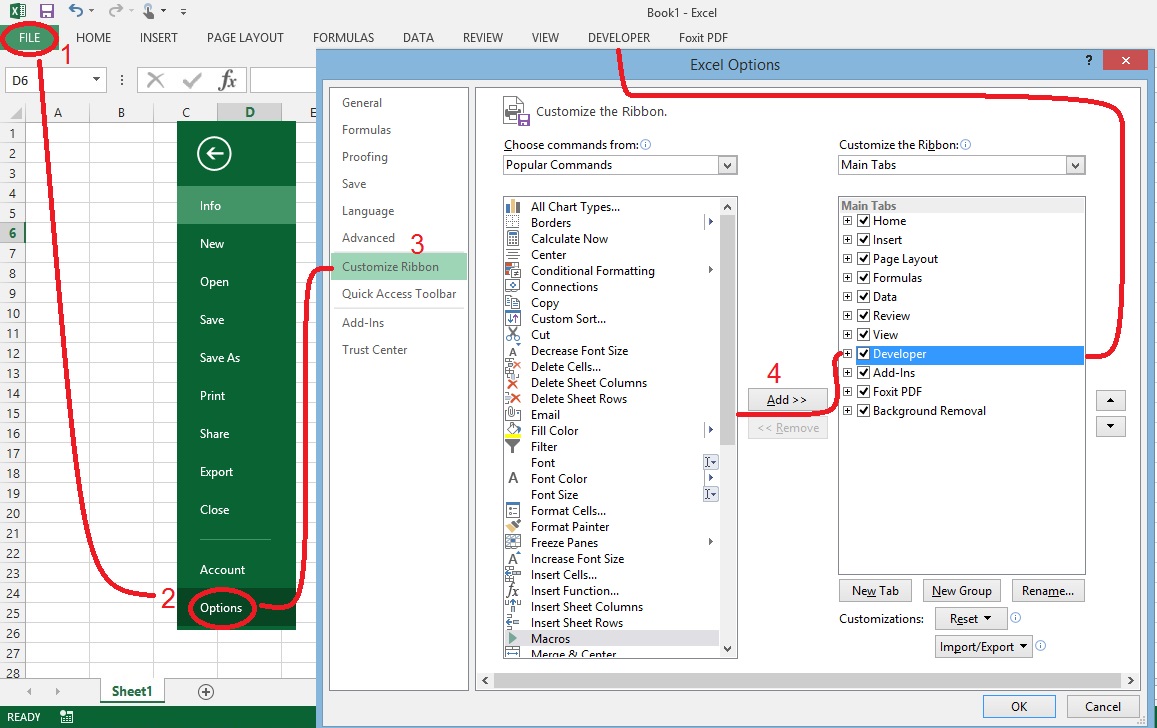
These steps are for the 2013 version. The web has plenty of examples for other versions
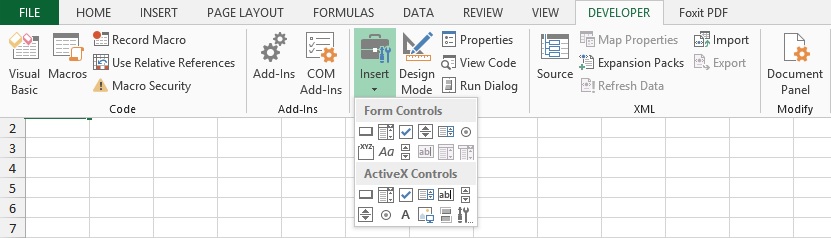
To add the Developer's Tab to the ribbon along the top follow the steps below:
Below is the controls associated with the Developer's tab
Notice the Visual Basic button on the left. Also the Macro button next to it.
Alt-F11 will also open the Visual Basic editor

The navigation window on the left lists all worksheets, user forms, or code modules. The window on the right shows the selected object. Each worksheet, user form, and code module is considered an Excel object.
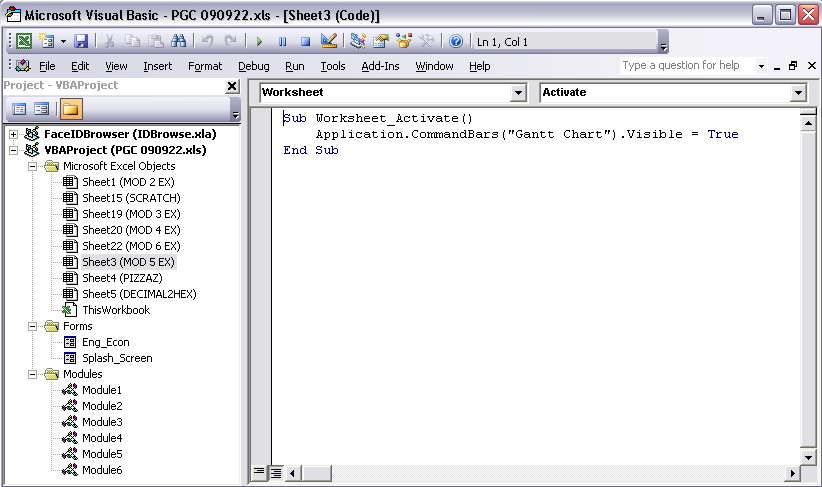
This object is at the bottom of the list of worksheet objects. The Workbook object is the code module for the entire workbook. Whatever code is put into this module is run at program startup. The code for this module can be found in the Source Code listing. We use the Workbook to assign a few functions to Alt keys and to show the opening Splash page.
Notice that the functions contain numerous Boolean functions set either true or false. If a function was running and called up a worksheet that would normally open a form, that event would stop the function until the form was manually closed. To prevent that from happening, Boolean functions associated with most forms are set at the start of a function to prevent a form from opening, and then reset at the end of the function to allow the form to reopen when needed.
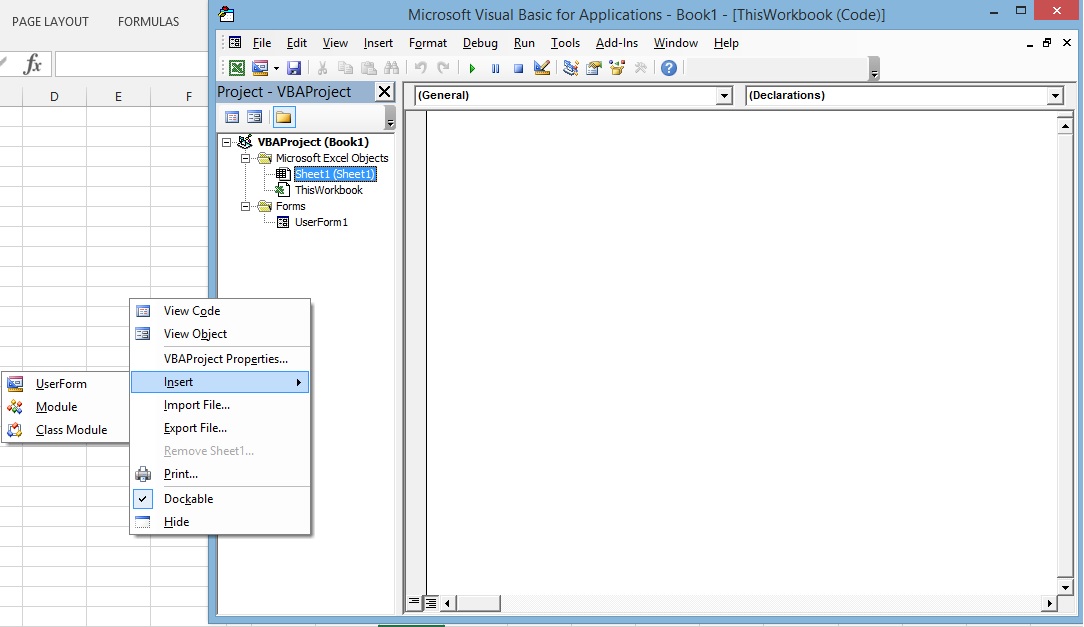
To insert objects rightclick on the Project area on the left
VBA is used to take a macro and turn it into a function that can automate the operation of Excel. It can be used to eliminate any repetitive tasks, especially those prone to mistakes. These can include tasks such as making sure bills are paid on time and ensuring that parts are not used twice or a bill is not paid twice.
VBA takes many of the original features of BASIC and expands on them. Long gone is the need for line numbers as in the old BASIC. VBA has adopted some of the features of other more powerful languages, such as Select Case statements from the C family. Using VBA also generally allows for quicker development time. VBA code runs more slowly than C++ and others; but, for what this section covers, speed won’t be an issue. VBA is a subset of VB (Visual Basic) and their properties, methods, and events are fairly close but not identical. But for the command syntax (For/Next; Select Case, Format(), etc.), VBA is a direct subset of VB. For .com objects--that is, the actual communications between VBA/VB, and various Microsoft Office objects, every version of VBA has its unique hierarchy. This means you can’t export a VBA program from Excel to Word, Access, or Visio and expect it to work, as each program has a different set of objects. You can import VBA forms into VB at the price of a longer runtime, but most VB forms cannot be imported into VBA, although VB .com components can be imported into VBA projects.
While many professional software developers prefer C++ to VBA, VBA is probably the optimal language for Excel projects and is used by engineers, scientists, and the world of finance. We envision that the people who will want to understand the code and add and enhance it will not have day jobs as programmers but will have other technical expertise that includes some coding ability. Because VBA is a part of the Excel file, it does not require a separate development tool, such as Microsoft Visual Studio, to create a working application. Unlike C++, C#, VB, Java, and other languages that need to be distributed as .exe, .dll, or other file types and be compiled, VBA is free with Excel. Although other languages need the ability to write to the OS registry to let Excel know an add-in exists, the VBA code is part of the Excel file. Notification to the operating system is not required. VBA may also access .com add-ins. These .com files may be added into your Excel VBA program by pointing and clicking, or at most, entering a single line of code. Our examples provide any references needed to run the provided code.
Although we refer to a sequence of instructions as procedures, there are two different code types: functions and subroutines. Both a function and a subroutine accept parameters from the calling procedure; only the function returns a parameter to the calling procedure. Procedures are generally stand-alone code segments, while functions and subroutines often are interconnected. In VBA the term subroutine, abbreviated Sub and End Sub, is used to create a block of code that is executed line by line when an event happens or it is called by another part of the code.
Procedures, subroutines, and functions may be recursive, that is, they may call themselves. We have tried to avoid this because each call to itself requires that the current state of the procedure is pushed onto the stack, and hence might result in a stack overflow and cause Excel to crash.
Subroutines or functions take a few different constructs. The Sequence construct is the simplest, because statements are executed in the order they’re found in the code.
The advantage of using a subroutine or function is that it eliminates the need to type a common task into many places in the code. Any changes are only made in the subroutine or function and not in many places in the code. This lessens the likelihood that you’ll overlook changes in the code and have to go back later and debug the code again when an unchanged subroutine results in an undesired behavior.
The other two are the Selection and Iteration constructs, both of which require a logical test of some sort. (An If/Then or Select Case statement is a logical test.) Logical tests can be performed on variables, calculations, results of functions, and controls (buttons, checkboxes, etc.). The test will result in true, false, or null/empty values. The Selection constructs are used when the flow of execution may flow down two or more paths.
The Iteration constructs are used when a block of code is required to be executed continually until a condition is met (such as a Do loop). Sometimes the numbers of iterations required are known in advance. In these cases a counted loop may be used (such as a For/Next statement).
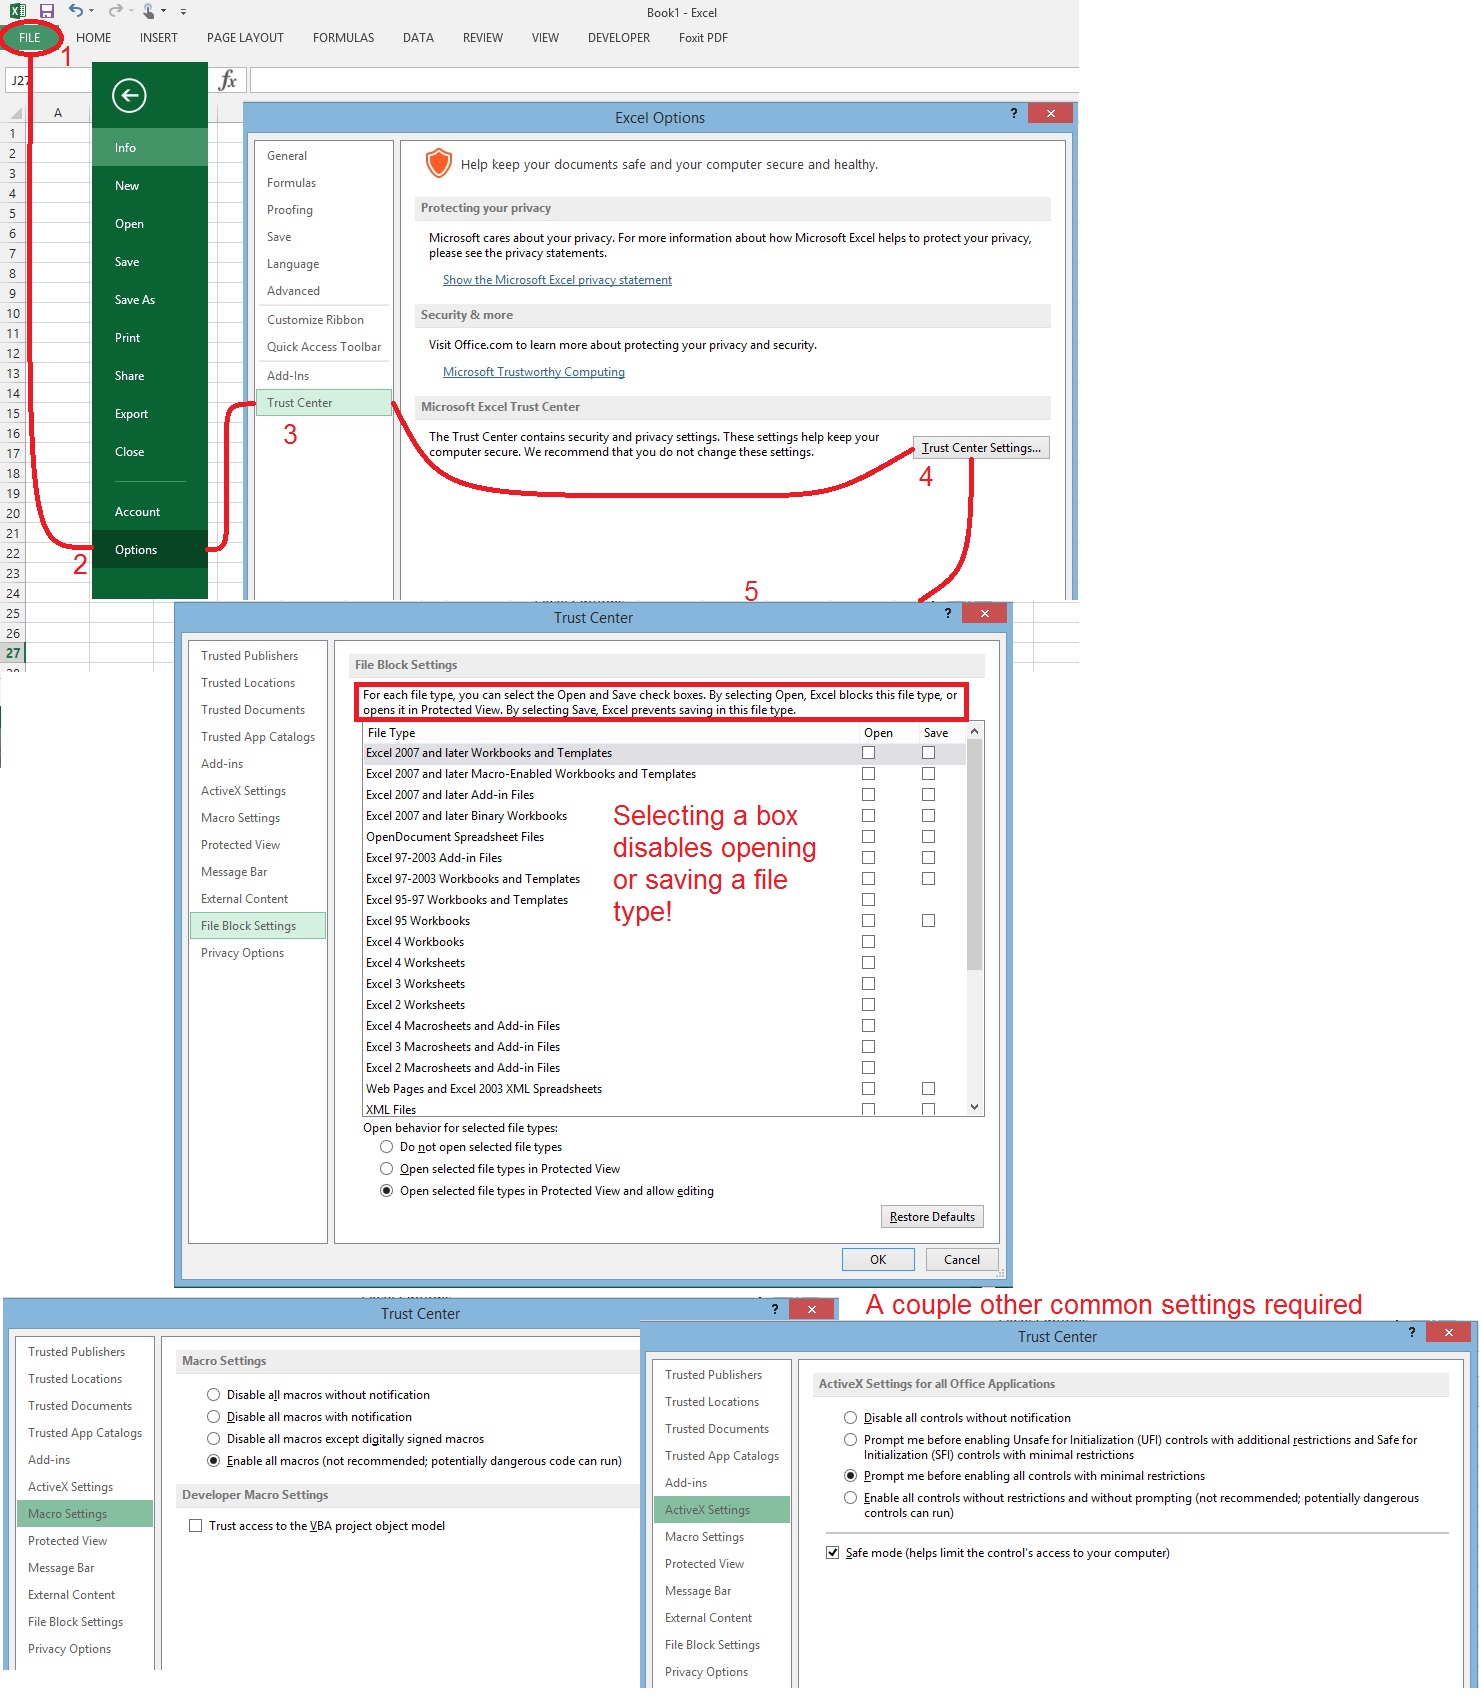
We cover the various constructs a little more closely soon. Before going onto programming it is necessary to set the security levels of your PC to allow VBA code and macros to run.
Security settings in the operating system may prevent you from developing or running VBA code. To prevent malicious software from harming your computer or stealing your identity run software only from trusted sources. To set security at a level that will allow your VBA code to run, in Excel do the following.

There are three types of Excel objects. These show up on the left side of Microsoft Visual Basic screen as seen above. These objects are worksheets (seen at the top), forms, and code modules.
Every time you record a new macro (see next section) after you have opened a workbook, a new module is added to the code modules. If you don’t want to keep those extra modules you can right click on a particular module and select Remove Module.
To see the code associated with any workbook or code module simply double click on the desired object. If you double click on a form you will see the form in a graphics editor. To see the code associated with the form, select an object on the form and double click again.
If you happen to select an object on a form that currently has no function associated with it, a new blank function will be created when the form’s code module is open. The same thing will happen if you double click an open area of the form.
A better way to see the source code associated with a form is to simply right click on the desired form label as seen on the left and select View Code.
We have generally organized the code in the numbered modules to correspond with the sections on this web page. It really doesn’t matter what module you put code into, as a function or subroutine call can be in any module and be called by another function in any other code module.
The only exception to this rule is the declaration of public variables in Module 1. They must be in Module 1 to be accessible by all functions. These public variables are also known as global variables.
By default, Visual Basic will let you watch a function as it performs its operations. This is often helpful in troubleshooting and understanding how a function works. The trade-off is some penalty in speed. In almost all instances the trade-off for what we are doing is minimal.
The command to turn off the viewing of operational updating is:
Application.ScreenUpdating = False
Above you can see that various controls, from buttons, drop down boxes, to radio and check boxes can be added to worksheets and forms.
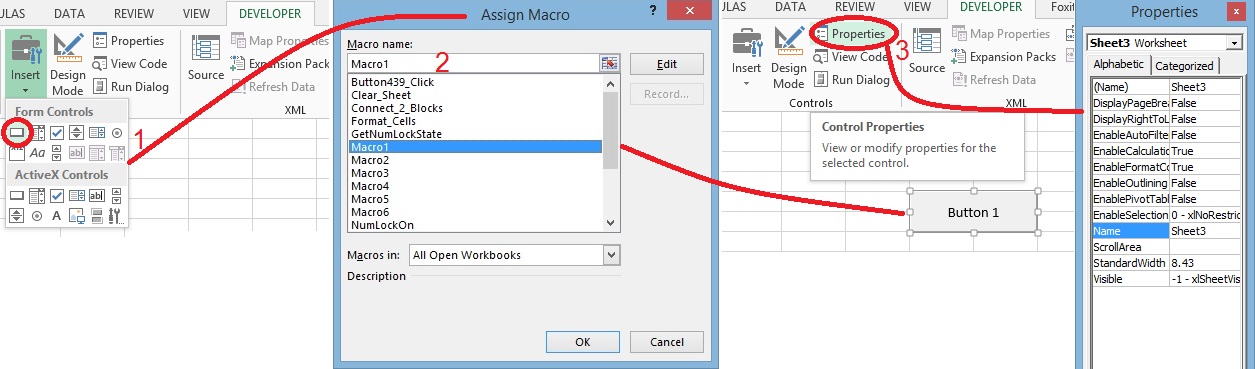
Below you can see the steps to adding a button to a worksheet, assigning a macro or sub routine to it, and then looking at it's properties. the macro or sub routine determines what happens when the button is selected.
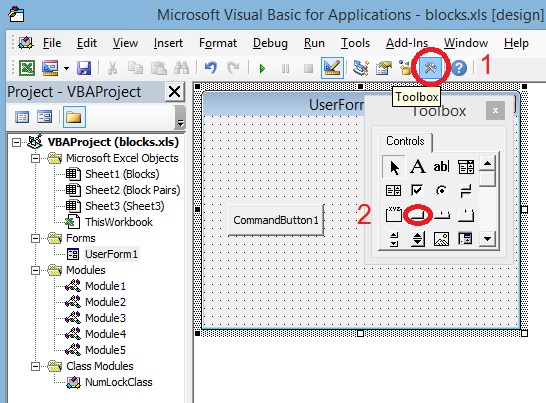
Below you can see how a button can be added to a user form
Recording a macro is the easiest way to discover the commands for controlling Excel (or any of the other Office products) outside of Visual Basic. A macro is a set or list of instructions that performs a task or set of tasks. Excel allows you to record a macro that converts a series of mouse and keyboard commands that you enter into a corresponding set of instructions that Excel understands.
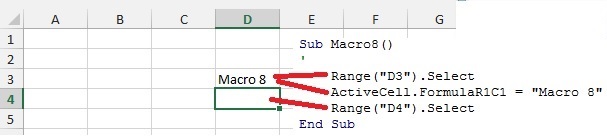
Above is a macro created by recording a couple of user actions. Here you see that the user first selected cell D3, then typed "Macro 8" into the cell and then selected cell D4 below it.
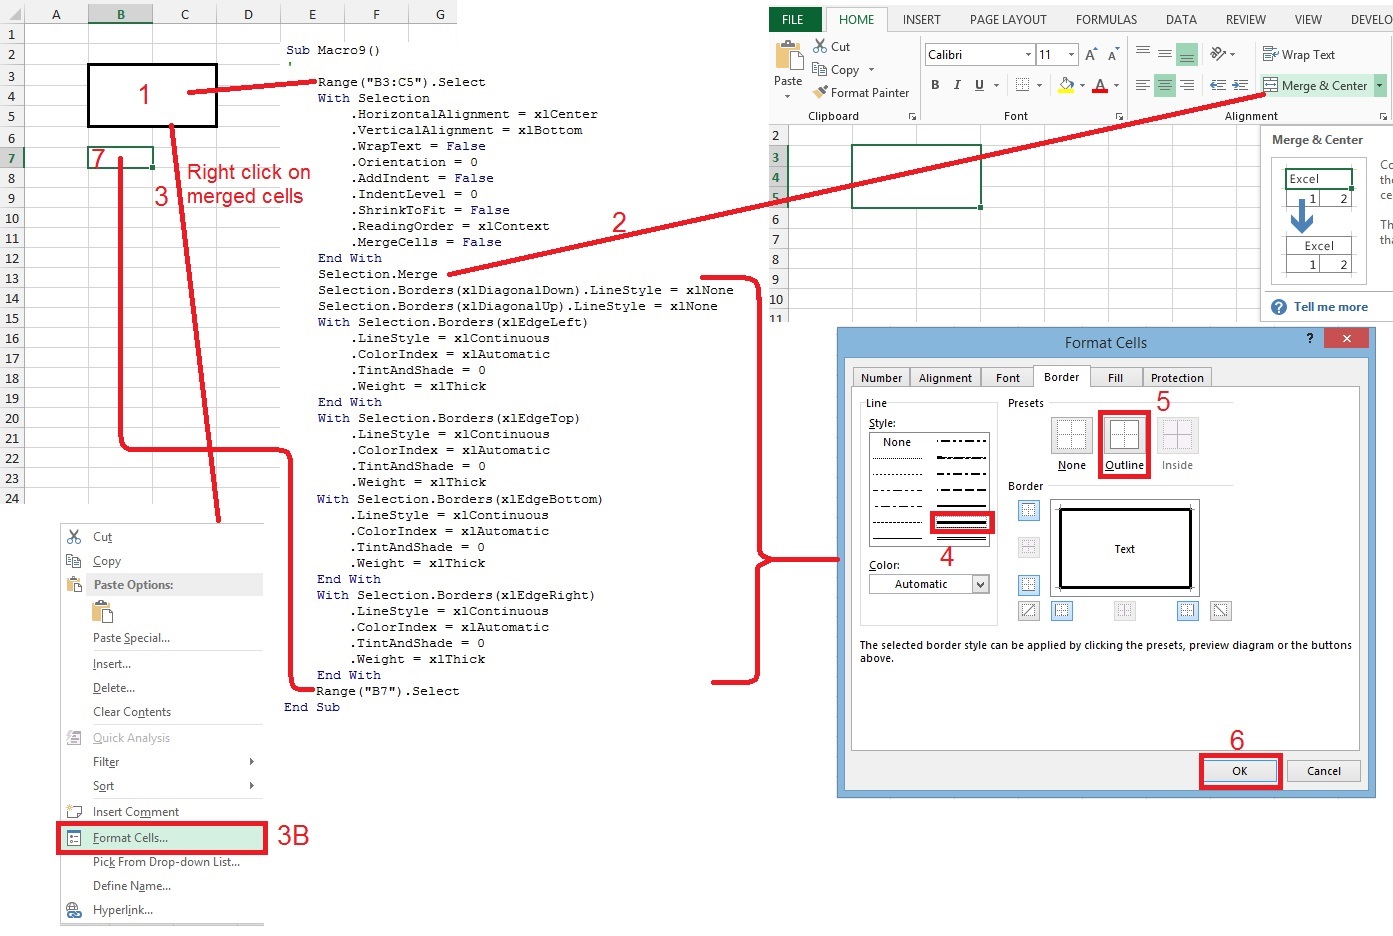
The above example is more involved. First the user merged cells (steps shown on the right). Then the user put a border around those cells, and lastly selected cell B7. The coded results captured in the listing of Macro 9. Often you can capture the Excel VBA code by recording a macro and then modifying it for your particular use.
Variables are used for temporary storage of numbers and strings. The variable name is simply an identifier used to label the data. In VB, variables must begin with a letter and must be less than 255 characters in length. VB doesn’t require a variable to be declared before use--we could simply declare in the middle of a function that x = 2 or y = ActiveCell, or Fred = x + 3, etc. However, this is definitely not recommended. Variables allowed to be declared on the fly means that a variable that is mispelled at places in the code would simply become another unintended variable. There are two ways to make variables have to be explicitly declared. One is to include Option Explicit statement at the top of each code module. The second is to force it as shown below:
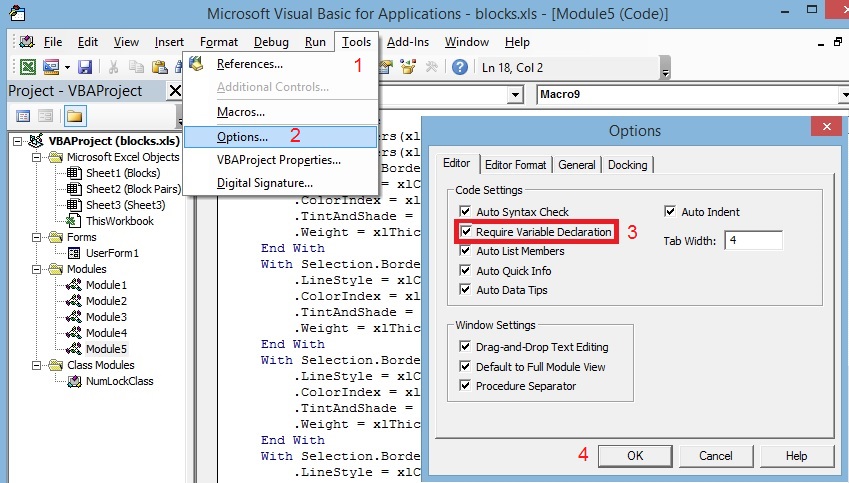
As a general rule, it is best to declare variables at the beginning of the code. Several possible ways of declaring a variable exist, and the way we declare a variable determines its scope and duration.
Dim is short for the word Dimension, and it declares and allocates storage space for one or more variables. If we use Dim before a variable in a function it means that this variable is only used and available to this function. If variables are defined at the top of a module they are available to all functions in that module. The default setting for an Integer value is zero and the default setting for a String is set to empty, etc..
Variables that are declared Public are available to all functions in all modules. Although it is stated that Public variables can be declared in any module, we have found that to reduce confusion it is best to declare a variable Public in Module 1.
Variables that need to hold their value between calls are declared as Static. A variable declared as Const (constant) is a special form of variable with a value that does not change throughout the program.
The "As" that follows each variable is required to set the variable type. If the As is omitted, the variable is automatically defined as a Variant.
Byte: Integer of 8-bit value, thus has a value between 0 and 255
Boolean: Single bit value that is either True or False
Integer: Integer of 16-bit value, value from -32768 to +32767 (whole numbers only)
Long: Integer of 32-bit value from (-2,147,483,648 to +2,147,483,647) (why aren’t these two numbers the same?)
Currency: Values from the +/- 922 trillion range
Single: Single-precision, 32-bit (eight significant digits) floating-point number
Double: Double-precision, 64-bit (16 significant digits) floating-point number
Date: Date value
String: Holds up to a 63,000-character sequence
Variant: Type that will change based on the value that is assigned to the variable
Navigation around a workbook using macros/functions/procedures doesn’t require VBA. It simply requires knowing the set of commands that Excel will respond to get you where you need to go. If you want variables to help decide where exactly you want to go, then it takes some VBA. Below is a list of commands and what they do.
To open an Excel workbook
Here we see a couple variables declared - workbook_name and path
Sub open_workbook()
Dim workbook_name As String
Dim path As String
workbook_name = “Project”
Path = “c:\My Documents\New Project\”
Workbooks.Open Filename:= Path & workbook_name & “.xls”
End Sub
Notice the last line - Workbooks.Open Filename. Workbooks is an Excel object, and Open is a function
of the Workbooks object.
The Workbooks.Open Filename:= Path & workbook_name & “.xls” line is the same as writing out
Workbooks.Open Filename:= c:\My Documents\New Project\Project.xls
Below shows the object browser in the VBA editor and how it is called up
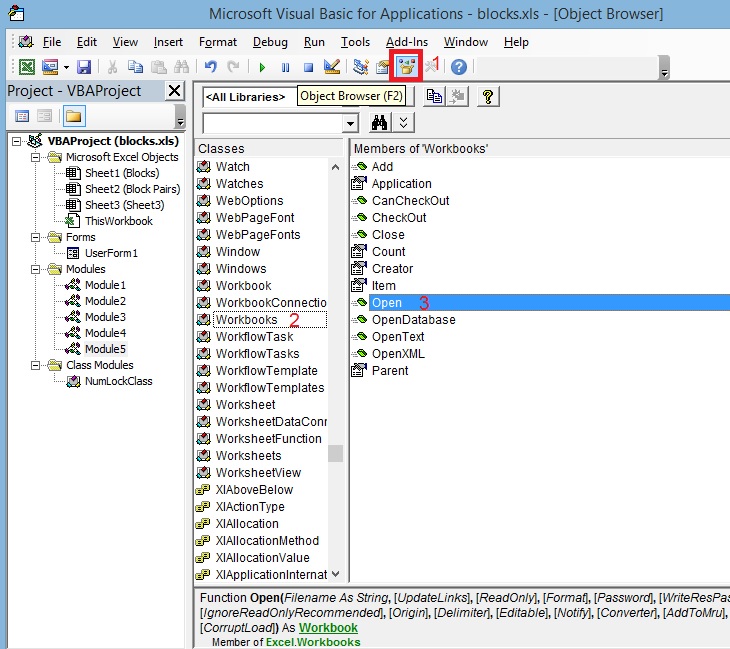
In the Members of "Workbook" plane are a combination of functions, property, and sub routine items.
We will look at classes later.
To open a different workbook
Sub open_different_workbook()
Dim workbook_name As String
workbook_name = “Project”
Workbooks(workbook_name).Activate
End Sub
To select a particular worksheet in a workbook:
Sub open_different_worksheet()
Dim worksheet_name As String
worksheet_name = “RACK ELEVATION”
Sheets (worksheet_name).Select
End Sub
Here Sheets is an object and Select is a sub routine of that object
Sub select_a_column()
Dim column_selected As String
column_selected = “BM”
Columns(column_selected & “:” & column_selected).Select
End Sub
Columns(column_selected & “:” & column_selected).Select results in:
Columns(BM:BM).Select
To select a particular row in worksheet:
Sub select_a_row()
Dim row_selected As Integer
row_selected = 17
Rows(row_selected & “:” & row_selected).Select
End Sub
Rows(row_selected & “:” & row_selected).Select results in:
Rows(17:17).Select
To select a particular cell in a worksheet:
Sub select_a_cell()
Dim cell_selected As String
cell_selected = “C5”
Range(cell_selected).Select
End Sub
Range(cell_selected).Select results in:
Range(C5).Select
To move from one cell to another:
Sub select_a_different_cell()
Dim different_row As Integer
Dim different_column As Integer
different_row = 3
different_column = 5
ActiveCell.Offset(different_row, different_column).Select
End Sub
ActiveCell.Offset(different_row, different_column).Select results in:
ActiveCell.Offset(3, 5).Select
To remember a point to come back to:
Point = ActiveWindow.RangeSelection.Address
Sub Get_Back_to_Point()
Range(Point).Select
End Sub
With a macro we can set any properties for a cell or group of cells that we are able to set manually via right clicking on a cell or range of cells and then selecting Format Cells.
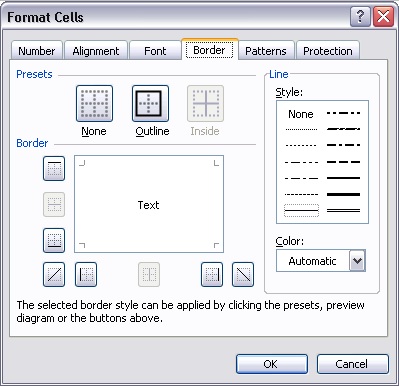
A number of tabs allow you to set cell type (Number), Text Alignment, Font, Border (the tab that is selected here), Patterns (cell colors), and Cell Protection. The Border tab is central to the graphical functions in Excel. It is with borders that we create boxes and lines and all the other graphic elements in Excel. As you become more familiar with the code you will see how we do this.
If we record a macro while formatting a cell we will get commands like those below:
Setting values in the Number tab:
Command to explicitly set a cell for Text: Selection.NumberFormat = "@"
Number: Selection.NumberFormat = "0.00"
Currency: Selection.NumberFormat = "$#,##0.00"
Date: Selection.NumberFormat = "m/d/yyyy"
Time: Selection.NumberFormat = "[$-F400]h:mm:ss AM/PM"
Percentage: Selection.NumberFormat = "0.00%"
Fraction: Selection.NumberFormat = "# ?/?"
Setting values in the Alignment tab:
We can set several parameters at once with the With Selection term, and end the selection with End With.
The terms are easily aligned with the parameters you actually find in that tab.
With Selection
.HorizontalAlignment = xlLeft
.VerticalAlignment = xlTop
.WrapText = True
.Orientation = 0
.AddIndent = False
.IndentLevel = 0
.ShrinkToFit = False
.ReadingOrder = xlContext
.MergeCells = False
End With
In the example shown above, if you only wanted to set whether to wrap the text:
Selection.WrapText = True
The same format would be used for any particular parameter.
Setting values in the Font tab:
Below we have set several font values, including a font color of red (ColorIndex = 3) in the selected
area:
With Selection.Font
.Name = "Times New Roman"
.FontStyle = "Bold"
.Size = 12
.Strikethrough = False
.Superscript = False
.Subscript = False
.OutlineFont = False
.Shadow = False
.Underline = xlUnderlineStyleNone
.ColorIndex = 3
End With
From the example above to set only the font would be:
Selection.Font.Name = "Times New Roman"
Or to set only the font size.
Selection.Font.Size = 12
Setting values in the Border tab:
As we mentioned at the beginning of this section, this tab is central to all the graphics we create with
Excel.
In this example, we have set a thin, continuous border around a cell or cells, depending on the area specified before these commands.
The first two lines indicate that no diagonal lines are to be in the area selected.
The next four With/End With statements show that left, top, bottom, and right sides of the area will
have continuous thin borders.
Selection.Borders(xlDiagonalDown).LineStyle = xlNone
Selection.Borders(xlDiagonalUp).LineStyle = xlNone
With Selection.Borders(xlEdgeLeft)
.LineStyle = xlContinuous
.Weight = xlThin
.ColorIndex = xlAutomatic
End With
With Selection.Borders(xlEdgeTop)
.LineStyle = xlContinuous
.Weight = xlThin
.ColorIndex = xlAutomatic
End With
With Selection.Borders(xlEdgeBottom)
.LineStyle = xlContinuous
.Weight = xlThin
.ColorIndex = xlAutomatic
End With
With Selection.Borders(xlEdgeRight)
.LineStyle = xlContinuous
.Weight = xlThin
.ColorIndex = xlAutomatic
End With
If you only wanted to change a single side, say the right side, to a thick line, without changing
anything else, you would use the command:
Selection.Borders(xlEdgeRight) .Weight = xlThick
Setting values in the Pattern tab:
We can set cells to a certain color and then come back and check the color of a cell to determine the
condition associated with that cell.
With Selection.Interior
.ColorIndex = 4
.Pattern = xlSolid
.PatternColorIndex = xlAutomatic
End With
General worksheet formatting:
Often we want to set a whole worksheet or area on a worksheet to some parameter.
If you want to set a parameter for all the cells on a worksheet: Cells.Select
If you want to select a single column: Columns("C").Select
If you want to select a number of adjacent columns: Columns("C:F").Select
If you want to select a number of non-adjacent columns:
Range("A:A,D:D,G:G,J:J,M:M").Select
The same can be done with rows:
Rows("36:36").Select
If you want to select an area:
Range("R2:AB11").Select
If you want to insert a column and shift everything right:
Columns("G:G").Select
Selection.Insert Shift:=xlToRight
To set column width:
Selection.ColumnWidth = 25
To delete multiple columns and shift everything to the left
Columns("G:Z").Select
Selection.Delete Shift:=xlToLeft
Again, you need to know the Excel command to accomplish something:
To find an unknown command, record a macro while performing the operation you want to automate!
Viewing the macro code will reveal the desired command.
Earlier we talked about Selection and Iteration constructs. One of the powerful ways that VBA,
or any high-level programming language, can automate a process is its ability to check the status of
various things and act accordingly. The most common and best known method is the If/Then statement.
It does exactly what it implies: If something happens or is true, then the software does something.
If ActiveCell > "" Then
‘Do some stuff
End if
The example above simply states that if the current cell is not empty (or, to be more exact is more than empty), then do some stuff.
If Selection.Font.ColorIndex = 4 Then
‘React to cell (or area selected) being green
ColorIndex = 4 means the color is green
Else:
‘React to cell not being green
End if
If Selection.Borders(xlDiagonalUp).Weight = xlMedium Then
Count = Count + 1
End if
The code above checks to see if the current selection or cell has a medium-weight diagonal line through it. If the selection does, then the code increases the count by one.
Another Selection construct is Select Case. The nice thing about this construct is that it makes it
easier to select among multiple choices or conditions. Select Case has an optional Case Else code that
is executed if no other case match is found.
Select Case Tab_Color
Case Is = 7
Color = "CONCEPTUAL"
Case Is = 44
Color = "INITIAL ENGINEERING"
Case Is = 6
Color = "PRE-DESIGN"
Case Is = 4
Color = "DESIGN DOCS"
Case Is = 8
Color = "DESIGN CONSIDERATIONS"
Case Is = 33
Color = "INTERMEDIATE DESIGN"
Case Is = 54
Color = "FINAL DESIGN"
Case Is = 38
Color = "IMPLEMENTATION"
End Select
Above we checked to see what the tab color is of a workbook, and assigned a color label to it based on its value.
Notice that this is an example of “structured” programming. We indent lines based on where they reside in the hierarchy of a programming structure. Notice the indentation if we nest an If statement within another If statement.
If Mid(Boundary, i, 1) = "," Then
x = 2
Point_2 = Left(Boundary, i - 1)
Point_3 = Right(Boundary, Len (Boundary) - i)
If Point_3 > "" Then
x = 3
End If
End If
Here we are looking for a comma in the middle of a string called Boundry. If we find it, we drop everything in Boundry before that character and call what is left Point_3. If Point_3 still has something left in the string, we set x = 3.
See how the second, or nested, If/Then statement is more indented than the first If/Then statement? This format helps us see more easily that the second If/Then statement resides within the first If/Then statement.
This structure is easier to read than:
If Mid(Boundry, i, 1) = "," Then
x = 2
Point_2 = Left(Boundry, i - 1)
Point_3 = Right(Boundry, Len(Boundry) - i)
If Point_3 > "" Then
x = 3
End If
End If
This is also known as iteration. We often need to perform the same action over and over until some condition is satisfied, or we need to repeat an action a predetermined number of times. In the first instance we use a structure known as a Do loop. In the second we use a For/Next loop.
The basic Do/loop repeats a specified action until a built-in Selection statement ends the loop.
Do loops have several ways to exit the loop. The first way is Exit Do. Its basic structure is:
Do
Statement
…
Statement
‘Do this each time through the loop
If
Exit Do
End if
Statement
…
Statement
Loop
Another way to exit a loop is by testing a condition either prior to or after executing the statements
within the Do loop. The name would change to Do/Until or Do/While
Do
‘Execute these statements each time through the loop
Statement
…
Statement
Loop Until (this condition is satisfied) or While (this condition is satisfied)
Next to test before the code within the Do loop is executed. This time the name would be While loop
or Until Loop.
Do While (this condition is satisfied) or Until (this condition is satisfied)
‘Execute these statements each time through the loop
Statement
…
Statement
Loop
Or we can stay in the loop until the If/Then statement is satisfied, then we can exit the Do loop.
In this case, the statements consist of the If/Else/End If decision, part of which includes the Exit Do
to terminate the looping.
Do
If ActiveCell > "" Then
ActiveCell.Offset(1, 0).Select
Row_Count = Row_Count + 1
Else:
ActiveCell.Offset(-Row_Count, 0).Select
Exit Do
End If
Loop
In the above example we use a Do loop to determine how many rows below a start point before we hit a blank cell. The If/Then statement tests that the current cell is not blank. If it isn’t blank, then we go down one row to the next cell and increase the Row_Count by one. In the Else part of the statement, if the cell is blank we go back up to the start point and exit the Do loop. The variable Row_Count tells us how many rows until a blank cell is reached.
The second iterative structure is the For/Next loop, which repeats an action a fixed number of times.
Its basic form is:
For i = 1 to SomeCount
‘Do this each time through the loop
Next i
The i value is a variable that is used to count. Because of its origins as a math variable this letter is often used. In this book we often use i, j, and k, and sometimes x, y, and z as variables.
If some desired condition is reached before we reach SomeCount, we could again include an If/Then statement with the command line Exit For in it to end the loop early.
In the example below, let’s take the value we derived above in the Do loop, Row_Count, and do the For/Next loop Row_Count times.
For i = 1 To Row_CountHere we go down a number of rows based on Row_Count and with an If/Then statement nested inside the For/Next we check to see if the ActiveCell value is equal to a value stored in Case_Selection. If so, then we go left three columns and gather the name in that cell and use that name to make visible a worksheet of the same name. We then go back three cells right and one row down. If the original cell didn’t equal the value Case_Selection, then we would simply go down one row and start the whole process over.
Below we have two For/Next loops, one nested within the other. This code instructs Excel to check 65
rows down (the i For/Next) and across 255 columns (the j For/Next loop [the entire width of a worksheet]).
An If/Then with the nested For/Next loop checks to see if the current cell is not only not empty but
that that the cell’s font is also blue (Selection.Font.ColorIndex = 5). If we find both conditions,
then we do some collection of data. In another nested If/Then statement we also check to see if the
cell has a diagonal line inside it, and if it does, we increase count by one.
For i = 1 To 65
For j = 1 To 255
If ActiveCell > "" Then
If Selection.Font.ColorIndex = 5 Then
Mfgr = ActiveCell
Point_3 = ActiveWindow.RangeSelection.Address
Range(Point_2).Select
ActiveCell.Offset(1, 0).Select
Point_2 = ActiveWindow.RangeSelection.Address
Range(Point_3).Select
End If
End If
If Selection.Borders(xlDiagonalUp).Weight = xlMedium Then
Count = Count + 1
End If
ActiveCell.Offset(0, 1).Select
Next j
ActiveCell.Offset(1, -255).Select
Next i
We can use a combination of Excel commands and VBA to parse and extract strings and data from variables and cells.
Let’s start with finding a column from a point. We could find a point with the
Point = ActiveWindow.RangeSelection.Address command.
It would yield a value that looked like this: Cell “C22” = $C$22.
Now if we wanted to extract only the column (“C”) value of the cell, we could use the subroutine below:
Sub Extract_Column()
Point = ActiveWindow.RangeSelection.Address
Column = Right(Point, Len(Point) - 1)
For i = 1 To Len(Column)
If Mid(Column, i, 1) = "$" Then
Column = Left(Column, i - 1)
End If
Next i
End Sub
Here Point equals the current range or cell selected. It is in the format $
Len(Point) returns the number of characters that comprise the variable Point. In the case of $C$22, Len(Point) = 5. So Right(Point, Len(Point) - 1) means extract all the characters starting at the right (or end of Point) and extending Len(Point) = 5 – 1 or four characters toward the left. That would leave C$22.
Next we go through the string Column one character at a time. The For/Next statement does that for Len(Column) or four times. Four is new value of the truncated column.
When a $ is encountered, make Column now equal to all the characters from the left (or start) of Column up till $, but subtract the $, which leaves C. To save a little time we could have added an Exit For statement after Column = Left(Column, i - 1).
When we capture three points, which we will do later to create rooms and areas, or to create lines, the captured points will look like this: $U$59,$AA$63,$AI$66. Here we have three points at “U59,” “AA63,” and “AI66.” We need to separate each of those three points into three separate points and then extract each column and row from each point. We do that with a series of Left, Right, and Mid statements instead of For/Next loops.
The For/Next loops are generally used to step through each character in a Point variable looking for dollar signs, and commas, which are used to delineate parts of the Point for disassembly into eventual column and row values.
There are two types of problems in programming. The easiest to see and usually the easiest to fix is the syntax error. This would be equivalent to a spelling error or an error in sentence structure. The second is an error in logic. Logical errors would be thinking the written code will behave a certain way, but the code behaving in an unexpected way.
For instance, there are seven days in a week. So, to determine the date of one week from today, add seven to today’s date. If today’s date is Monday the 3rd,then next Monday will be the 10th because 3+7 equals 10 So, you write your code accordingly. However, what if today were Monday the 27th applying the same logic, then next Monday would be the 34th because 27+7 equals 34. The code worked, but did not produce the desired results, so you would have to rethink all the cases and modify the code accordingly. Syntax errors are normally found when typing in the code or when the code is compiled. Errors in logic are normally found when the results of running the program are not as expected. Several ways to root out the problems are discussed in the following sections.
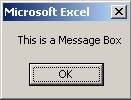
One of the simplest ways to get the user’s attention during normal execution of your program or to flag a problem during a debug session is to display a message box. The simplest message box looks like this:
A message box that allows a Yes/No response from the user can be created as follows:
iReply = MsgBox(Prompt:="Does route continue?", _
The _ allows you to continue the arguements on a new line
Buttons:=vbYesNo, Title:="Continue Route")
If iReply = vbYes Then
‘Do some stuff
End If
If iReply = vbNo Then
‘Do some different stuff
End if
iReply is the variable we generally use to store the user’s input. Any string variable is allowed. We use the MsgBox command for this. The message-box structure can be as simple as MsgBox (“Hello”), or we can add the arguments above to give the message box a new title and a couple of user-input buttons.
A related command is the Input Box.
Signal_Out = InputBox(Prompt:="Path/Source", _
Title:="Fly In Info", Default:="")
This command allows you to input a string of data. As indicated in the command, you can provide a prompt and a default response. In the example above, we have elected to provide no default response.
Many things can conspire to cause VBA code to command Excel to do something it does not like, which usually ends in the display of some nondescript error code and a crashed program. : We can approach this in one of two ways: either intercept the error and shepherd the program off to somewhere else, or allow the error to occur and let VBA’s debug tools help us find and fix the problem.
This is the GUI you get when an error has occurred. Not much hint as to what went wrong.
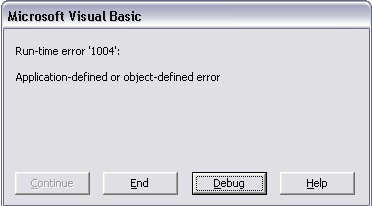
But if you hit Debug you are taken to the line of code that had the error.
Here we have a one-line function, and Debug has highlighted our one-line program with an error.
Sub test()
ActiveCell.Offset(0, -280).Select
End Sub
With this function we asked Excel to move way off the left edge of the sheet.
Let’s add a line that tells VBA to go to a spot in the program if an error occurs and display a
message:
Sub test()
On Error GoTo You_Did_Something_Wrong
ActiveCell.Offset(0, -280).Select
Exit Sub
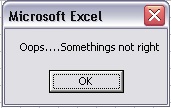
You_Did_Something_Wrong:
MsgBox ("Oops....Somethings not right")
End Sub
The added code causes the GUI below to be shown when the mistake is encountered.
A couple of new things have been introduced here, the first of which is the On Error command. This command must be followed by a GoTo statement and a label. Labels are old BASIC constructs that can jump to commands in a function that are run when an error is incurred. Here we can see that the label is aptly named You_Did_Something_Wrong. A label is identified by a colon at the end. VBA will not let you indent a label statement, so it does not allow the usual formatting we follow when writing structured code.
Below the label we added the message-box command that displays the GUI shown here. Also notice the
Exit Sub command above that causes the function to end if everything went right.
We just saw how errors can be pointed out. One way to discern if a line of code is causing errors is to add an apostrophe to the beginning of a line of code. VBA interprets that whole line to be a comment for human consumption and ignores it when executing. So we can go to the function that is causing the grief and “comment out” any On Error comments (‘On Error). This will cause the VBA debugger to go to the offending line of code when you choose the Debug option on the first GUI in the previous section.
We can also add markers to our code that can be used to check its execution at any given point. By selecting View -> Immediate Window in the VBA Project GUI, or simply pressing Ctrl+G, we can open an additional window as seen below.
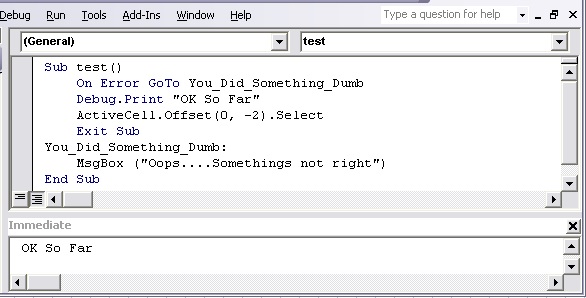
Whenever the code encounters a Debug.Print command, it displays the string surrounded by quotes in the window. A drawback to this command is that there is no automatic way to clear the contents in the Immediate window. You must do that manually.
The easiest way to start testing new code is by using the F8 key to step through new code. Each time you press the F8 key you execute a single line of code and then step to the next line. This way you will immediately see when you get to a line of code that is causing problems.
As you step through the code, you can hover the cursor above variables to see their current values. This allows you to see how the code is processing various commands.
Another common way to troubleshoot code is to enter breakpoints in the code to cause the code to stop immediately before the line of code with the breakpoint. You can set or reset a breakpoint by selecting a line of code and pressing F9.. By selecting Debug -> Clear All Breakpoints or Ctrl+Shift+F9, you can clear all breakpoints at once.
Below is a simple function that goes down a column 10 rows while filling in each cell it encounters
with the line number. The results can be seen at the lower right. Here we have opened the Local window
via Views -> Local Window. This window shows us the values of the variable defined in this function.
We have also set a breakpoint at the end of each iteration through the For/Next loop.
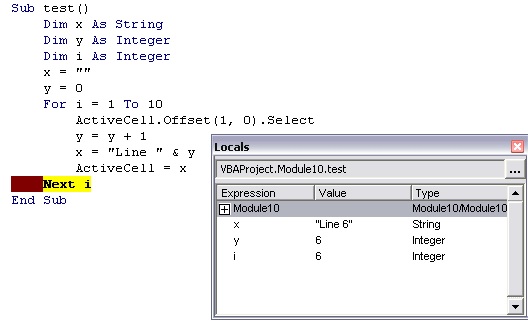
Here you can see that we are at the sixth iteration through the loop (i = 6).
We can also force the execution of code to stop if a condition is not met.
Here we added the command Debug.Assert and a condition in parentheses.

At the end of the program y was not greater than 12, so execution of the code stopped.
Another great debugging tool is the Watch command. This is initiated by:
View - > Watch Window. We can then define what we want to watch by
Debug -> Add Watch.
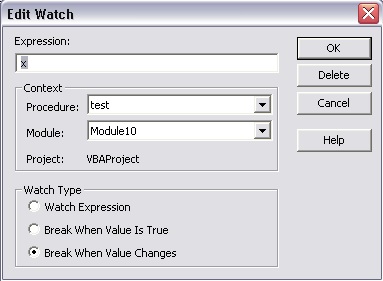
From the Debug menu selection we can Add a Watch or Edit an existing Watch.
We select the variable we want to watch and then select one of three Watch types.
Because we selected Break When Value Changes, the code stops execution whenever the value of the watched variable changes. Here we see that execution has stopped before the next line of code because the value of x has changed.